[Windows 10] How to restore backup (system image backup) of entire pc
How to restore the [Windows 10] PC entire backup (system image backup)
Table of contents
Prior confirmation
Method of operation
How to Restore from a state in which Windows is running
How to Restore from a state in which the power is off
If there is a recovery environment of Windows 10 in SSD / HDD within
SSD / If you do not have Windows 10 recovery environment in the HDD
Prior confirmation
- If you want to restore a PC from a system backup image, you will not be able to select the item to restore individually. The current application, system settings, and files are replaced all, it will return to the contents of the time that created the system image, please note. Before you perform a restore, please confirm whether the backup image is up to date. In addition, if a backup before you start is saved, for example, on a removable disk, please ensure that you can use.
- If you want to restore from a state in which the power is off, the recovery environment (recovery partition) of Windows 10, the system repair disk, you must have one of the recovery drive.
▼ related Q & A:
For [Windows 10] system repair disk and recovery drive
- BitLocker Drive Encryption, or if you are using an encrypted device, please disable the encryption in advance.
If you proceed without disabling the encryption you may experience errors. You may also see a BitLocker menu in this process prompting you to temporarily disable encryption, please temporarily decrypt before proceeding.
Method of operation
- How to Restore from a state in which Windows is running
1. Click the Start button.
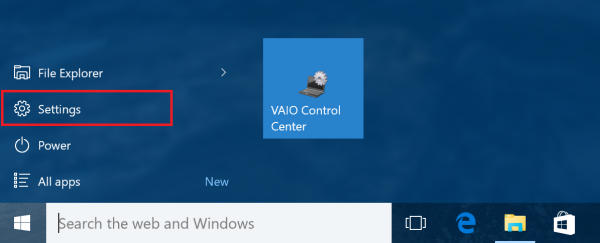
2. Since the start menu is displayed, I then select [Settings].
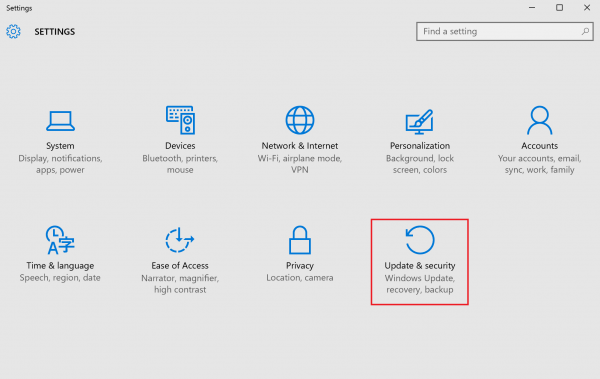
3. The “Settings” screen will appear, please select [Update and Security].
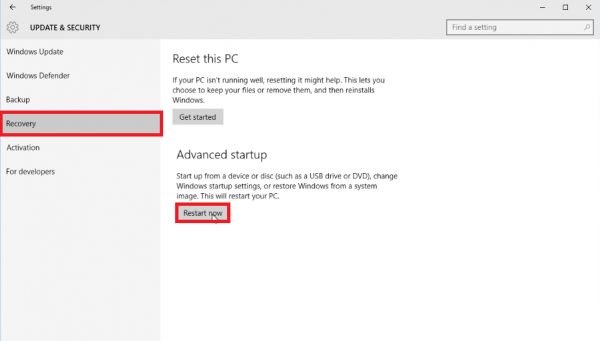
4. While the “Updates and Security” screen is displayed, select the [Recovery] tab, then click the [Restart Now] button below “Advanced Startup”
5. After the restart, the “Choose and option” screen is displayed, select [Troubleshoot].

6. While the “Troubleshoot” screen is displayed select [Advanced Options].

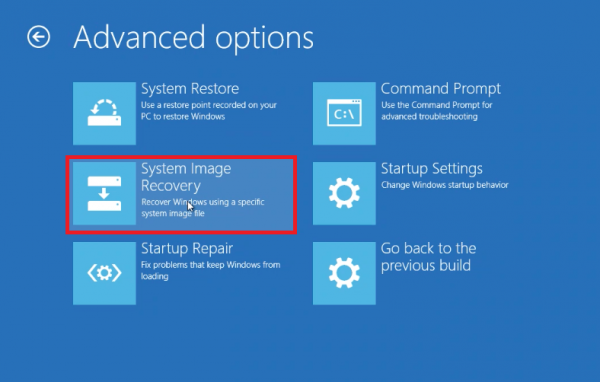
7. While the “Advanced options” screen is displayed, and the equipment that your data is backed up data is on, has been inserted or connected, select [System Image Recovery].
8. While the “System Image Recovery” screen is displayed, select the user account.
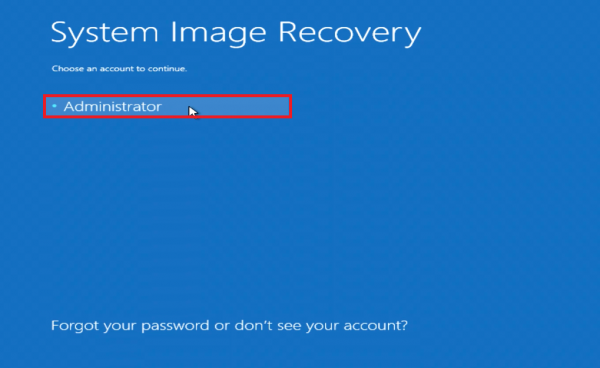
- Only accounts that have administrator rights are displayed.
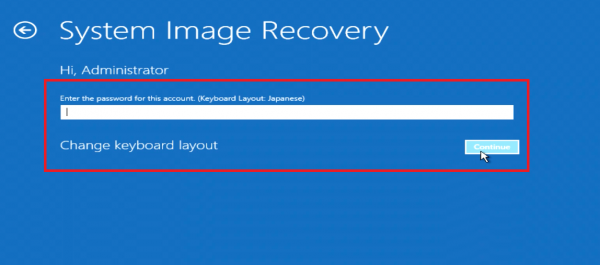
9. While the password input screen is displayed click continue after entering your admin password. If you have not set a password, select the Continue button with the password field left blank.
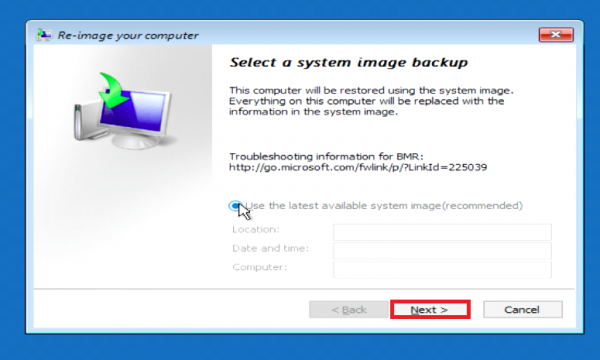
10 The “Select a system image backup” screen will appear, if you want to restore to the latest system image, check the [Use the latest of the available system image] (recommended), and then click [Next].
- The size of the text can be large, sometimes all of the information will not appear on this menu. This is a limitation of the OS.
【Reference information】
When you press [↓] key while having [Use the most current of the usable system images (recommended)] option selected, when you select [Next], you can select the desired system image.
1. The next menu will say [Please select the location of the computer that you want to restore, select the location where the system image are saved, and then select the Next button.
2. The next menu will say [Please select the date and time of the system image to restore, select any date and time [Next] and select the button.
【please note】
- This computer will be restored using the system image. Everything on this computer will be replaced with the information in the system image.
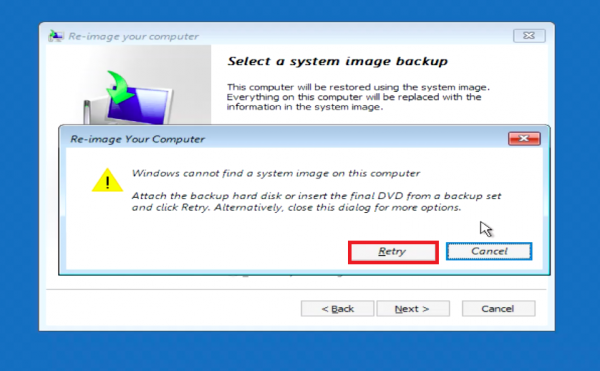
- The “System image is not found on this computer.” appears if the image has not been located or recognized yet, please select [Retry]. It takes time to recognize connected devices, you may need to select [Retry] several times.
- If you backed up to multiple DVD media please insert them in order. The image will not be recognized if the media is not inserted in the correct order.
- If you have not set a password, select the Continue button with the password field left blank.
11. The next menu will say “Please choose another restoration method” please select [Next].
12. [Computer, will be restored from the following system image:] will be displayed, and after verifying the system image, then select [Done].
13. While the following message is displayed, Message: “this computer will be restored using the system image. Everything on this computer will be replaced with the information in the system image.” if you want to continue, select [Yes] button
14. Restoration will begin.
【please note】
- Due to the amount of data to be restored, it can take from a few minutes to a few hours.
Please wait without turning off the power.
- If you interrupt your work by pressing [Stop Restore], the PC will be in a state where Windows can not start, please do not select [Stop Restore].
15. When restoration is complete, A menu will appear that asks if you would like to [Restart now] or not. If you click [Do not restart] you will be taken back to the option selection screen.
This completes the operation above.
How to Restore from a state in which the power is off
- Using the recovery environment within Windows 10 included on SSD / HDD
Regarding Windows 10 pre-installed models, there is a recovery environment in Windows 10 (recovery partition) in the SSD / HDD in the state immediately after the purchase, do the restoration of the system image backup from Windows 10 recovery environment in the following procedure .
※ In the case of the upgraded VAIO to Windows 10 you please confirm the [Reference information] procedure [4].
1. Turn off the computer.
2. [F3] or press the power button while holding down the [F4] button.
※ VJZ12A * Series, + side or the VOL (volume control) button – Press and hold the side, press the power button
3. While [VAIO rescue mode screen is displayed, select Start the recovery feature of VAIO.
4. While the [Choose and option] screen is displayed, choose [Troubleshoot].

【Reference information】
In the case of Windows 10 upgrade model, you will not be able to activate the recovery environment of Windows 10 in this procedure. Please execute the following procedure.
- If the power of the computer is on, and then shut it down by pressing more than the power button for 4 seconds long (turn off the power).
- Turn on the power.
- When the VAIO logo appears, and then shut it down by holding down the power button for 10-15 seconds.
- Repeat steps 2 through step 3 three times.
- Turn on the power.
- The “Preparing Automatic Repair” screen will be displayed, please wait for a while. (The wait time will vary depending on your machine).
- While Auto Repair screen is displayed, select [Advanced Options].
- While the “Select Options” screen is displayed, choose [Troubleshoot].
5. While the “Troubleshoot” screen is displayed, select [Advanced Options].

6. While the “Advanced options” screen is displayed, and the equipment that your backed up data is on, has been inserted or connected, select [System Image Recovery].

7. While the “System image Recovery” screen is displayed, select the user account.

- Only accounts that have administrator rights are displayed.
- “Please choose the desired operating system.” appears, please select the [Windows 10]. In this case, go to step 13.
8. While the password input screen is displayed click continue after entering your admin password. If you have not set a password, select the [Continue] button with the password field left blank.

9. Since the screen [re-application of computer image appears, if you want to restore to the latest system image, check the [Use the latest of the available system image (recommended), and then click [Next].
- The size of the text can be large, sometimes all of the information will not appear on this menu. This is a limitation of the OS.
【Reference information】
When you press [↓] key while having [Use the most current of the usable system images (recommended)] option selected, when you select [Next], you can select the desired system image.
- Please select the location of the computer that you want to restore. select the location where the system image is saved, and then select the Next button.
- Please select the date and time of the system image to restore, select any date and time [Next] and select the button.
【please note】
- “To restore this computer, you will need to format the drive that is currently running the Windows Recovery Environment.” If you and it appears, that it can not perform a restore of the system image backup as it is, is “Power Follow the steps in “If there is no recovery environment of Windows 10 in the SSD / HDD” in the way “to restore from the cut in that state, please do the restore operation.
- The “System image is not found on this computer.” appears if the image has not been located or recognized yet, please select [Retry]. It takes time to recognize connected devices, you may need to select [Retry] several times.
- If you backed up to multiple DVD media please insert them in order. The image will not be recognized if the media is not inserted in the correct order.
- If you have not set a password, select the Continue button left blank.
10. The next menu will say “Please choose another restoration method” please select [Next].
11. [Computer, will be restored from the following system image:] will be displayed, and after verifying the system image, then select [Done].
12. While the following message is displayed, Message: “this computer will be restored using the system image. Everything on this computer will be replaced with the information in the system image.” if you want to continue, select [Yes] button
13. Restoration will begin.
【please note】
- Due to the size of the data to be restored, it will take from a few minutes to a few hours. Please wait without turning off the power.
- If you interrupt your work by pressing the Restore Stop], it will be in a state where Windows can not start, please do not select Restore Stop.
14. When restoration is complete, A menu will appear that asks if you would like to [Restart now] or not. If you click [Do not restart] you will be taken back to the option selection screen.
This completes the operation above.
- SSD / If you do not have Windows 10 recovery environment in the HDD
System in any matter, and if the recovery environment of Windows 10 in the SSD / HDD (recovery partition) has been deleted, if you can not boot from the recovery environment (recovery partition) of Windows 10 in the SSD / HDD, the following procedure We will do the restoration of the system image backup from the recovery disk or recovery drive.
1. In a state in which the power of the computer is on, insert the system repair disk or recovery media, or connect it to turn off the power.
2. [F3] or press the power button while holding down the [F4] button.
※ VJZ12A * Series, + side or the VOL (volume control) button – Press and hold the side, press the power button
3. Since [VAIO rescue mode screen is displayed, and then select Start from USB memory or disk.
4. [Press any key to boot form CD or DVD …] and when it is displayed, press any key.
5. While the keyboard keyboard layout screen is displayed, select the [Microsoft IME].
6. Because the Select Options screen is displayed, select [Troubleshoot].

7. Since the “Troubleshoot” screen is displayed, select [Advanced Options].

8. Since the Advanced Options screen is displayed, and inserted and connected the equipment to the backed up data is entered, or to back up the media data is in the drive, and then select recover the system in the image].

9. The next menu will say “Please choose another restoration method” please select [Next].
10. Since the screen [re-application of computer image appears, if you want to restore to the latest system image, check the [Use the latest of the available system image (recommended), and then click Next. ] you will select the button.
- The size of the text can be large, sometimes all of the information will not appear on this menu. This is a limitation of the OS.
【Reference information】
When you press [↓] key while having [Use the most current of the usable system images (recommended)] option selected, when you select [Next], you can select the desired system image.
1. It appears as [Please select the location of the computer that you want to restore, select the location where the system image are saved, and then select the Next button.
2. It appears as [Please select the date and time of the system image to restore, select any date and time [Next] and select the button.
【please note】
- The “System image is not found on this computer.” appears if the image has not been located or recognized yet, please select [Retry]. It takes time to recognize connected devices, you may need to select [Retry] several times.
- If you backed up to multiple DVD media please insert them in order. The image will not be recognized if the media is not inserted in the correct order.
- It should be noted that the media insertion and later that was last used, please replace the media in accordance with the instructions on the screen.
- If you have not set a password, select the Continue button left blank.
11. It is because it is displayed that [please choose other restoration method, and then select the Next button.
12 [Computer, will be restored from the following system image:] will be displayed, and after verifying the system image, then select [Done].
13. While the following message is displayed, Message: “this computer will be restored using the system image. Everything on this computer will be replaced with the information in the system image.” if you want to continue, select [Yes] button
14. Restoration begins.
【please note】
- Due to the size of the data to be restored, it will take from a few minutes to a few hours.
Please wait without turning off the power. - If you interrupt your work by pressing the Restore Stop], it will be in a state where Windows can not start, please do not select Restore Stop.
15. When restoration is complete, A menu will appear that asks if you would like to [Restart now] or not. If you click [Do not restart] you will be taken back to the option selection screen.
This completes the operation above.

