[VJZ12A*] I can’t use the wireless keyboard
Wireless keyboard is not functioning properly am unable to input characters using the keyboard.
The keyboard is unresponsive.
The touch pad is not operating correctly.
Applicable Products
VAIO Z CANVAS (VJZ12A)
Table Of Contents
Workaround
1. Ensure that the power switch on the keyboard is not in the “OFF” position
2. Ensure the battery of the keyboard is charged
3. Ensure the “Keyboard Receiver” is not set to “Airplane Mode”
4. Ensure the distance between the keyboard and the Canvas is not too great.
5. Re-pair the keyboard with the Canvas
6. Change “Preferred Band” from “No Preferred Band” to “Preferred 5.2GH Band”
7. Change the “2.4GHz for 802.11n channel width” from “Auto” to “20MHz”
8. Change the transmission power from the “Best” to “Middle and High”.
1. Ensure that the power switch on the keyboard is not in the “OFF” position
If the keyboard power switch is set to “OFF”, please switch to “ON”.
Even if you are connecting the keyboard to the VAIO display with a USB cable (sold separately) the power switch on the keyboard needs to be in the “ON” position.
[Caution]
Please do not turn the wireless keyboard ON/OFF too often. It may cause the wireless keyboard to malfunction.
2. Ensure the battery of the keyboard is charged
When the battery is completely discharged, when switching the keyboard switch from “OFF” to “ON” the “Caps Lock” key does not light up.
In that case, please charge the keyboard by attaching the keyboard to the product.
Please ensure that “Airplane Mode” is set to “OFF” by following the steps.
1.Click the start button.

2. Select “Network and Internet”.
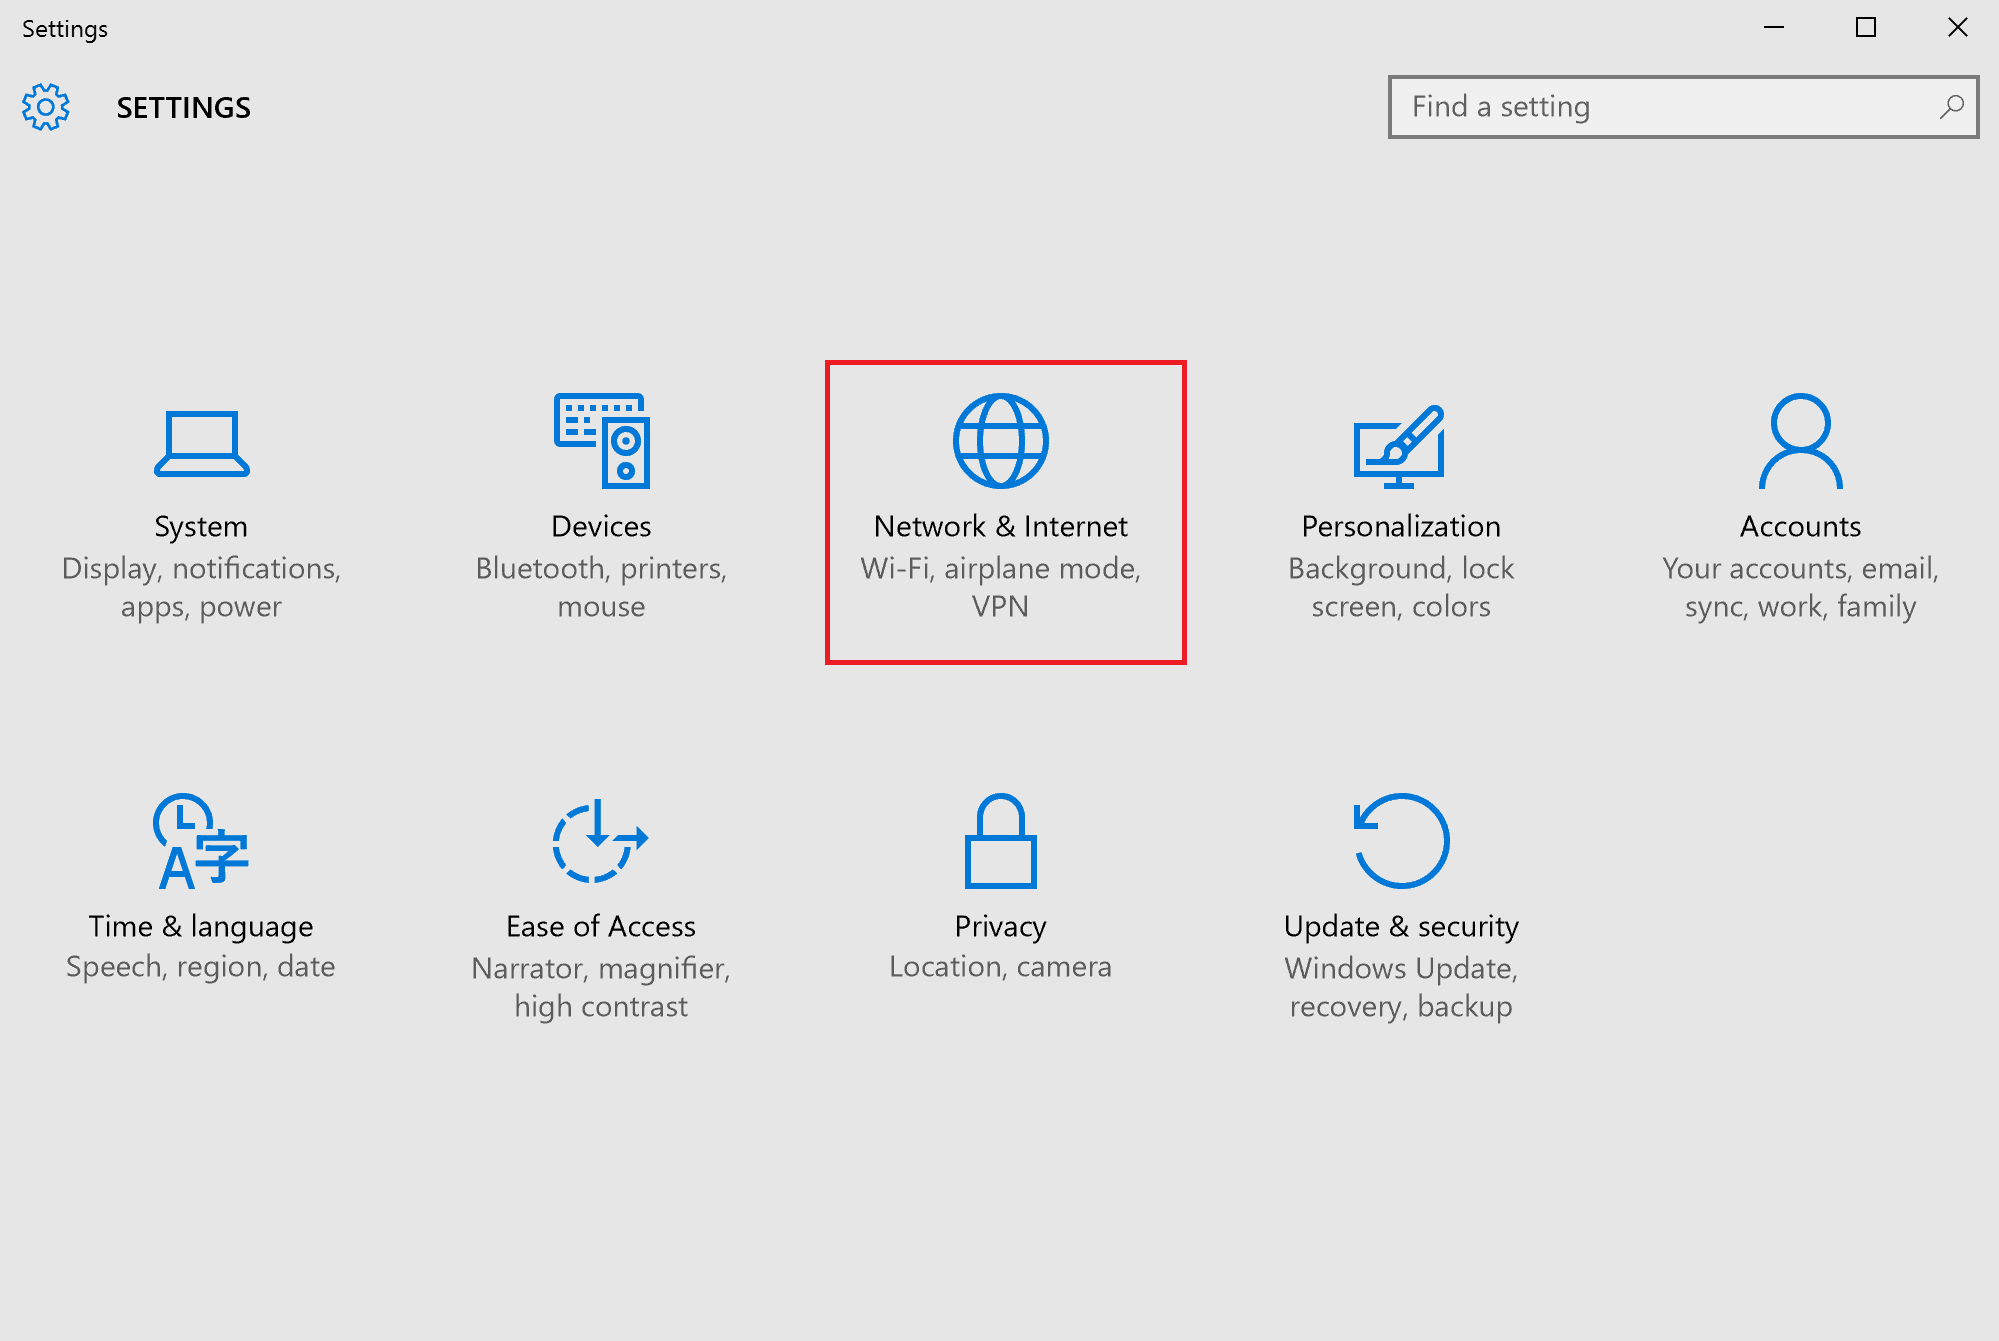
3. If the “Airplane Mode” is set to “ON”, change it to “OFF”. If the “Keyboard Receiver” is set to “OFF”, please set to “ON”.

4. Ensure the distance between the keyboard and the Canvas is not too great.
If the functionality of the keyboard has not improved, continue to Step 5.
Follow these steps to facilitate the re-pairing of the keyboard, to see if the keyboard begins to function.
1.Ensure that the keyboard switch is in the “OFF” position.
2. Restart the VAIO.
3. After the restart, the front of the VAIO body, place as close to the keyboard within 2 cm.
4. If you hold down [Ctrl] key and the [Esc] key at the same time on the keyboard, you can adjust the keyboard power switch to “ON”.
[Caps Lock] is on the key “Caps Lock” light. When the connection is completed, the light turns off.
This completes the operation above.
1. The keyboard power switch according to the “OFF” to turn off the keyboard.
2. In a state in which the power of VAIO body is on, in front of the VAIO body, place as close to the keyboard within 2cm.
3. If you hold down [Ctrl] key and the [Esc] key at the same time on the keyboard, you can adjust the keyboard power switch to “ON”.
[Caps Lock] is on the key “Caps Lock” light blinks. When the connection is completed, the light turns off.
6. Change “Preferred Band” from “No Preferred Band” to “Preferred 5.2GHz Band”
1. Access the Device Manager screen.
2. From the Device Manager screen, and then double-click the Double-click the network adapter] (double tap in the case of the touch panel), “Intel (R) Dual Band Wireless-AC 7265”.
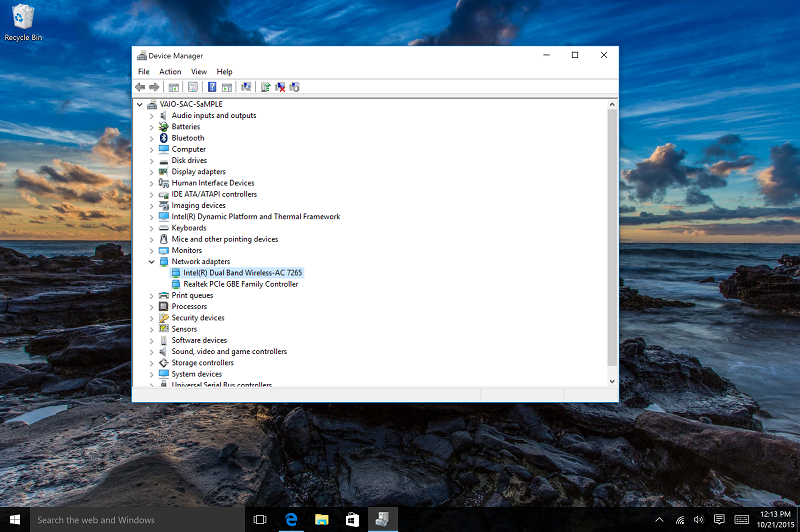
3. While the “Intel (R) properties of the Dual Band Wireless-AC 7265” screen is displayed, and then select the Advanced tab.
4. Inside the “Properties” listing Select “Preferred Band”.
5. Change the drop down from the 1. no priority] to [3. 5.2GHz band priority of] and Click the [OK] button.

7. Change the “2.4GHz for 802.11n channel width” from “Auto” to “20MHz”
1. Access the Device Manager screen.
2. From the Device Manager screen, double-click the network adapter (double tap if you are using the touch panel), “Intel (R) Dual Band Wireless-AC 7265”.
3. While the “Intel (R) properties of the Dual Band Wireless-AC 7265” screen is displayed, select the Advanced tab.
4. On the Advanced tab screen under “Properties” Select the downward triangle button from the field, and then select “2.4GHz for 802.11n channel width”.
5. Change the “Value” field from “Auto” to “20 MHz”, click the [OK] button to check the operation of the keyboard.

8. Change the transmission power from the “Best” to “Middle and High”.
1. Access the Device Manager.
2. From the Device Manager screen, Double-click the “Network Adapter” (double tap if you’re using the touch panel), “Intel (R) Dual Band Wireless-AC 7265”.
3. While the “Intel (R) properties of the Dual Band Wireless-AC 7265” device menu is displayed, select the Advanced tab.
4. On the Advanced tab screen under “Properties” Select the downward triangle button from the field, and then select “Transmit Power”.
5. Change the “Value” field from “Highest”, and change it to “Medium-high” and then click the [OK] button and check the functionality of the keyboard.
