[VJZ12A*] How to use L button/R button
[VJZ12A*] How to use L button/R button
How to use VAIO Z Canvas
How to use L button/R button
By pressing L button/R button, you can access shortcut key menus and enable/disable the touch panel.

Table of contents
How to use shortcut key menu
How to use touch panel’s enabling/disabling function
How to use VAIO Pencil Board
How to change the setting
How to use shortcut key menu
[ Basic functions ]
The shortcut key menu will be displayed at the left side of the screen, when you press L button (setting at the time of purchase).
Window size will be adjusted automatically, while compatible apps are active.
Please refer to the “How to change settings” step below if you do not want the window size to change automatically.

* Per the settings at the time of purchase, the shortcut key menu will only be displayed on desktop screen.
Please refer to “How to change settings” (hyperlink) if you want to display on Windows store app too.
Arrow buttons
It will switch the list of software shortcut keys (key set), when multiple shortcut keys are registered.
Software shortcut key
Registered shortcut key will be issued by pressing the button.
By using this function, you can perform shortcut key operations by without having to use the keyboard.
Please refer to “How to change settings” (hyperlink) on how to register/change shortcut key.
Tool button
Displays tool key set menu, when you press the button.
[Tool key set ]

Fan mode
Change settings for CPU and fan’s action mode.
Every time you press, the mode switches: “Standard” ⇒ “Silence” ⇒ “Performance”.
You can also change from “VAIO settings”.
Pen pressure mode
Change setting of the pen’s pen pressure adjustment.
Every time you press, the mode switches: “Normal” ⇒ “Hard” ⇒ “Soft”.
By press-and-hold, the customize screen for pen pressure curved line will appear.
You can customize the pen pressure curved line per each mode.
The pen pressure curved line can also be customized from “VAIO settings”.
Color mode
Changes color management mode setting.
By pressing the color mode button you have the option to toggle between “D65” mode and “D50” mode.
This button will be displayed when the setting “Use VAIO calibrate color mode” is selected within “VAIO settings”.
Pen mapping (ONLY AVAILABLE IF YOU ARE CONNECTED TO AN EXTERNAL DISPLAY)
Select this if you want to operate the external display screen by pen.
This button will be displayed when an external display is connected, and outputting through “extension”.
Please refer to the “Pen mapping operation method” step below for detailed instructions.

Settings button
You can register/change software shortcut key, and change the allocations for L button and R button.
Please refer to the “How to change settings” step below for details.
Pen mapping operation method]
When operating the window displayed on external display by pen
- Connect an external display.
- Select “Device” ⇒ “Display” ⇒“ Extension” from charm.
- Under this condition, press “Pen mapping” button on tool key set.
- It will say “In order to setup as tablet PC screen…”.

- Message will be displayed on the external message by either pressing the Enter of the shortcut key menu, or Enter key.
- While this message is displayed tap VAIO’s main screen with pen.
【Precautions】
Please follow the following procedures before unplugging the display cable, if you have performed this setting.
If you do not perform this operation, the pen operation territory may not be correct, the next time you output to an external display.
In this case, output once as “extension”, and perform the following procedures.
When operating (put it back to the original state) the window displayed on VAIO by pen
- Connect an external display.
- Select “Device” ⇒ “Display” ⇒ “Extension” from charm.
- Under this condition, press “Pen mapping” button on tool key set.
- It will say “In order to setup as tablet PC screen…”.
- While this message is displayed, tap VAIO’s main screen with pen.
How to use touch panel’s enabling/disabling function
[ Basic functions ]
If you press VAIO’s R button, you can switch the touch panel’s enabling/disabling (setting at the time of purchase).
Every time you switch, it will say at the bottom center of the screen: “Touch panel enabled” or “Touch panel disabled”.
When the touch panel is disabled, you cannot operate touch panel by fingers, and you can only operate by pen.
This will come in handy if you want to concentrate on drawing with pen.
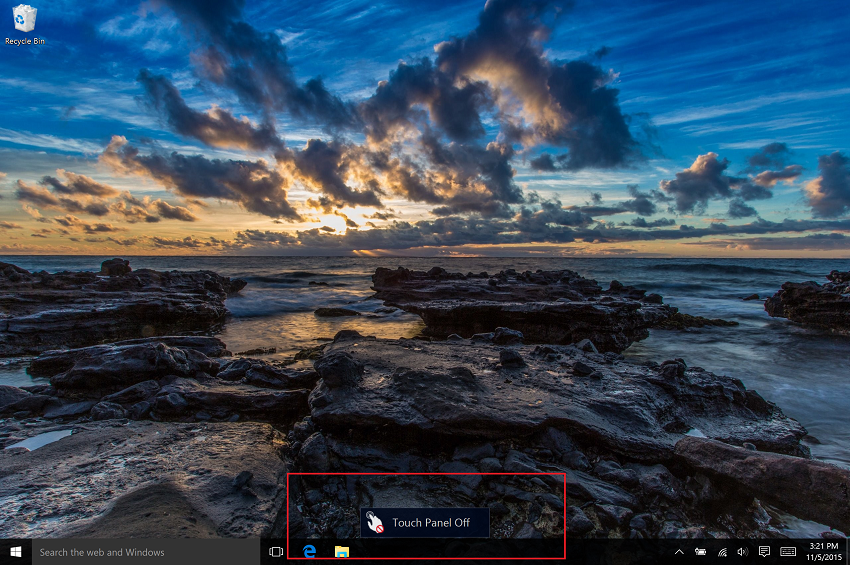
*Even when touchpanel is disabled, the shortcut key menu can be finger-operated.
How to use VAIO Pencil Board
*This function has been added by VAIO Button Control update program
[ Basic functions ]
By changing the setting, you can startup VAIO Pencil Board by pressing VAIO’s R button.
Please refer to “How to change settings (hyperlink)” on how to change setting.
Instead of disabling touch function for the whole screen, VAIO Pencil Board can disable touch function only for a specific territory (territory of board).
*You may use the stylus on parts of the screen where touch functions are disabled.
[ Explanations on each parts ]
By changing the setting, you can startup VAIO Pencil Board by pressing VAIO’s R button.
Please refer to “How to change settings” step below for details.
Instead of disabling touch function for the whole screen, VAIO Pencil Board can disable touch function only for a specific territory (territory of board).
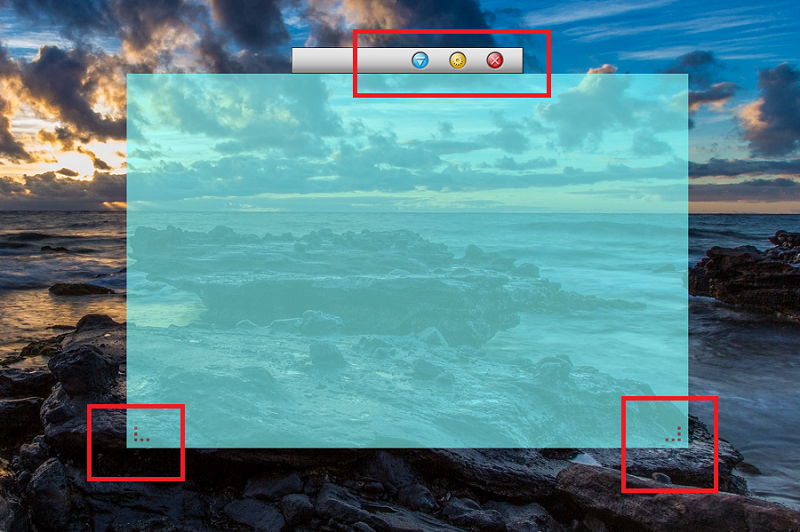
Display/hide button (Blue Button)
You can toggle between showing and hiding the pencil board.
Settings button (Yellow Button)
You can change the board color or transparency.
Close button (Red Button)
Closes VAIO Pencil Board.
Change size (Dotted right-angles)
You can change the size of board by dragging.
You cannot operate this setting by touch. It can only be modified by using the digitizer/stylus.
How to change settings
Setting dialog will be displayed, when you press the settings button for tool key set.

[ Overall ]
Main body button
Allocating main body button
You can change allocation of L button/R button.
Displaying position
Displaying position of shortcut key menu
You can change the displaying position of shortcut key menu.
Touch panel
*A part of this function is changed by “VAIO Button Control” update program.
VAIO Pencil Board function
Startup VAIO Pencil Board instead of disabling touch function of the whole screen.
Switch touch panel’s enabling/disabling by keyboard
You can switch touch panel enabling/disabling by Fn (function) key + 2 (number).
VAIO Pencil Board can be started up/ended, if VAIO Pencil Board is enabled.
Function that prevents touch panel disabling (test function)
This function is a test function. If it affects other functions, please disable this function.
Also, this function can be changed/deleted announced.
A message saying the touch panel is disabled will be shown when touch operation is performed while touch panel is disabled.
You can also have this messaged displayed at all times while the touch panel is disabled.
*This setting will not function while VAIO Pencil Board is enabled.
Linking Windows touch button
You can also enable Windows touch buttons as well when touch panel is disabled or when starting up VAIO Pencil Board.
Others
Display within Windows store app
By enabling this function, you can display the shortcut key menu also in start screen and on Windows store app.
For Windows 10, the shortcut key menu can be displayed regardless of this setting, so we have deleted the “Display on Windows store app”.
Auto-fit function
*This function moves to key registration screen by “VAIO Button Control” update program.
When you enable this function, the window size of compatible app will be automatically adjusted, when displaying shortcut key menu.
Standard key set is not compatible with auto-fit function.
Like the Adobe Illustrator CC touch work space, it will not be automatically adjusted even when windows size cannot be changed.
For compatible app, please refer to the following [Key registration].
[ Key registration]
You can register shortcut keys for each compatible apps.

(Pictured from Left to Right)
Arrows button
It moves between key sets, if there are multiple key sets.
Key set adding button
Adds new key set. You can register up to 4 key sets.
Key set deleting button
Deletes the key set.
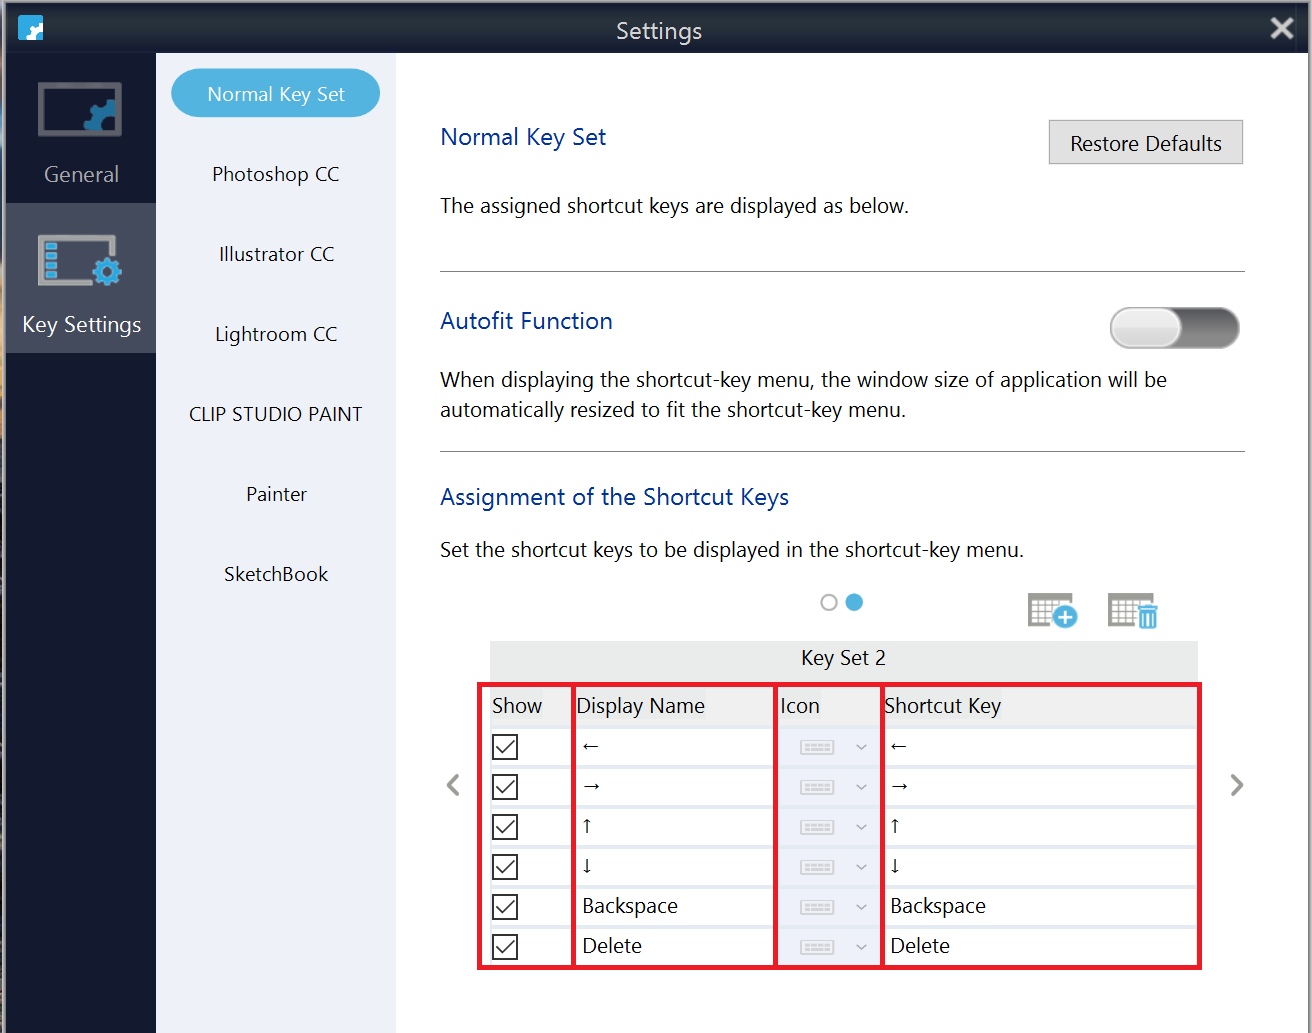
(Pictured from Left to Right)
Show Shortcut Key
Select display/hide of the shortcut key button.
Displaying name
Enter the button name to display in shortcut key menu.
Icon
Select icon to display in shortcut key menu.
Shortcut key
Register shortcut keys.