[VAIO_PC] Overview and how-to-use of VAIO ClippingTool
Applicable Models
VAIO Clipping Tool Pre-installed models
Table of contents
Description
Prior confirmation
Method of operation
Description
The VAIO Clipping Tool is an application used to create cut out images using the image information displayed on the screen. You have the ability to do this in any desired shape, save the image to a desired location, and insert said image into Microsoft OneNote or Power Point for example.
Prior confirmation
If you want to insert cut images into Microsoft OneNote and PowerPoint, please run the pre-application setup for each of those programs.
Method of operation
How to use the edge detection feature.
1. Organize your screen with the information you would like to capture with the clipping tool.
2. When you are ready, press [Fn] key and the [1] key at the same time.

3. On the menu that is displayed, you can select [Edge Detection].
4. Place the border that you want to detect edges inside of using automatic [Edge Detection] and you will automatically be taken to the editing screen. To do this, click and drag your pointer creating a border around the image information that you would like to clip.

Please note:
If you are using the stylus pen, press and hold the left-click on the touch pad and drag the stylus on the screen to enclose the area you would like to want to clip.
While the editing screen is displayed, you have the option to Save, Copy, and to start-up of the various apps that can utilize your clipped image.
Please Note: This reference is specifically for Edge Detection clipping
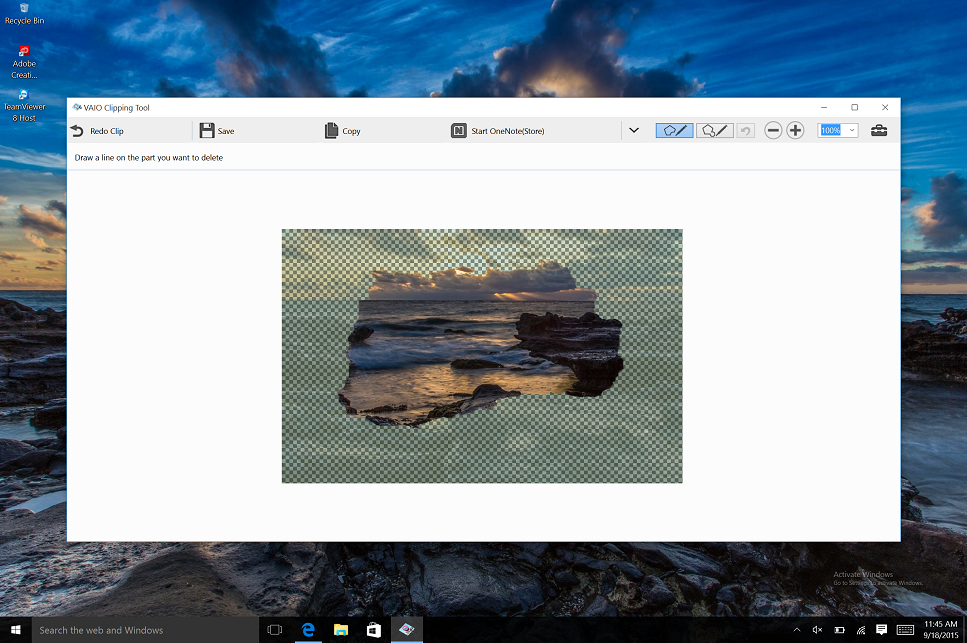
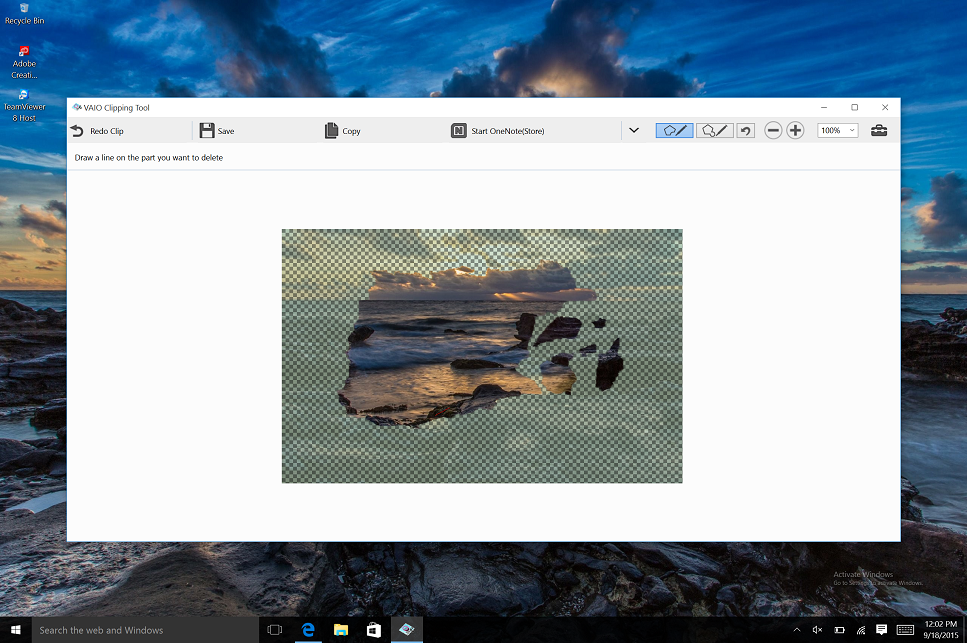
You may remove portions of your selected clipping by using the [Fix Delete] function.

After selecting the Fix Delete icon from top right of your editing window.
While holding left click surround the area you would like to remove from your initial clipping.
Release left click and that portion will be removed.
This can be done using the stylus as well as the touchpad.
After selecting [Fix Add] you may select additional image information to be added to your clipping.
After selecting the Fix Add icon from top right of your editing window.
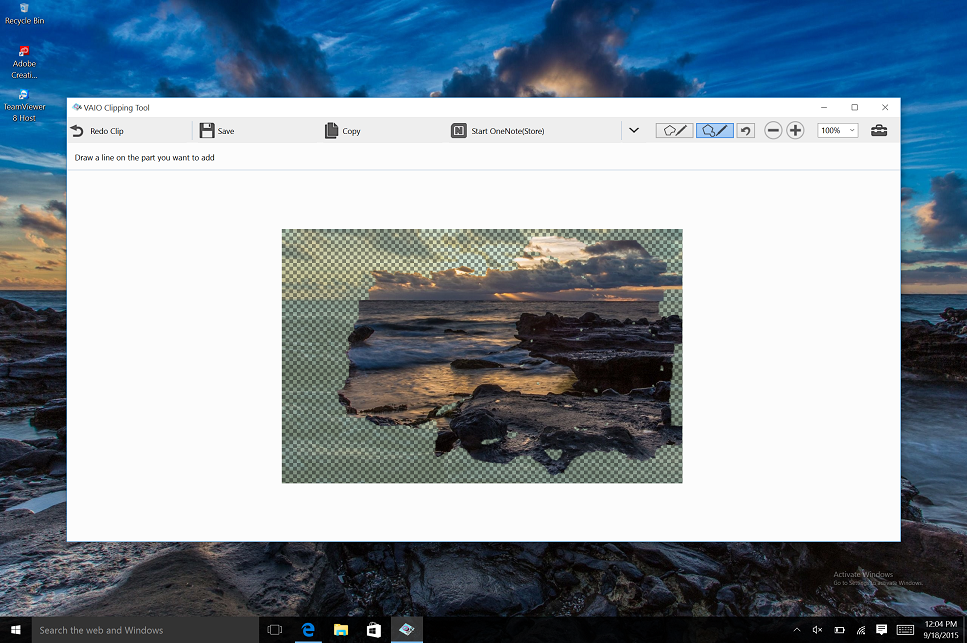
While holding left click surround the area you would like to add to your initial clipping.
This can be done using both the stylus as well as the touchpad.
By clicking the [+] button, [-] button, or changing the % amount in the drop down list inside the editing window the display size of the editing screen can be modified.


The setting screen is accessed by pressing the far right [Tool Box] icon, in this menu the color of the line used to select your clipping area and the color surrounding the clipping itself can be modified.

VAIO Clipping tool screen 2
Once the border is placed we will have the option to select one of the following:
[Save]: I save the clipped image information to any location.
[Copy]: you can copy the selected image to the clipboard. It will paste a copy in the other apps.
[To start OneNote (Store version): I will start the OneNote (Store version).
[To start OneNote (desktop version): I will start the OneNote (desktop version).
[Start PowerPoint]: Start PowerPoint.
This completes the operation above.
How to Cut out the entire screen
Choose if you want to cut the full screen you are viewing.
When you see the Cut want the screen, press [Fn] key and the [1] key at the same time.
Since the menu is displayed, and then select [Full Screen Clip].
While the editing screen is displayed, you have the option to Save, Copy, and to start-up of the various apps that can utilize your clipped image.
This completes the operation above.
How to clip the Active Window
When you see the Cut want the screen, press [Fn] key and the [1] key at the same time.
While the menu is displayed, you can select [Active Window Clip].
While the editing screen is displayed, you have the option to Save, Copy, and to start-up of the various apps that can utilize your clipped image.
This completes the operation above.
How to clip a Rectangular Shape
When you see the Cut want the screen, press [Fn] key and the [1] key at the same time.
While the menu is displayed, you can select [Rectangular Clip].
If you are using the stylus pen, press and hold the left-click on the touch pad and drag the stylus on the screen to enclose the area you would like to want to clip.
While the editing screen is displayed, you have the option to Save, Copy, and to start-up of the various apps that can utilize your clipped image.
This completes the operation above.
How to clip a Circular Shape
Press [Fn] key and the [1] key at the same time.
While the menu is displayed, you can select [Circular Clip].
If you are using the stylus pen, press and hold the left-click on the touch pad and drag the stylus on the screen to enclose the area you would like to want to clip.
While the editing screen is displayed, you have the option to Save, Copy, and to start-up of the various apps that can utilize your clipped image.
This completes the operation above.
How to clip in Free-Form
Choose if you want to cut the screen to specify the range in the free form.
When you see the Cut want the screen, press [Fn] key and the [1] key at the same time.
Since the menu is displayed, you can select cut in the free-form].
If you are using the stylus pen, press and hold the left-click on the touch pad and drag the stylus on the screen to enclose the area you would like to want to clip.
While the editing screen is displayed, you have the option to Save, Copy, and to start-up of the various apps that can utilize your clipped image.
This completes the operation above.